Pages

Search This Website

Monday, March 6, 2017

How To Create Animated GIFs From Images in Android

How To Create Animated GIFs From Images in Android
As we know, clicking pictures and making GIF from them is much better than live screen recording, as it consumes less memory. Therefore, we are going to share an easy method that will help you capture screenshot in the form of GIF. Go through the post to know about it.

There are lots of tools available today on Google Play Store for screen recording and screen capturing that records the live screen display but all these apps generate bulk sized files of screen recordings. And this can pay a load on your Android storage, so here we have the alternative for it that is merging images in the form of animated GIF, and with that, you can see the live effects of the things performing on your Android. And this can be done very easily with the app that we will be discussing here. So follow the complete guide presented below to proceed.
How To Create Animated GIFs From Images in Android
This method depends on a cool Android app by which you can combine up two screenshots and that will be making animated GIF screenshot and will be of the very lesser size that the other apps create. So follow the steps below to proceed.

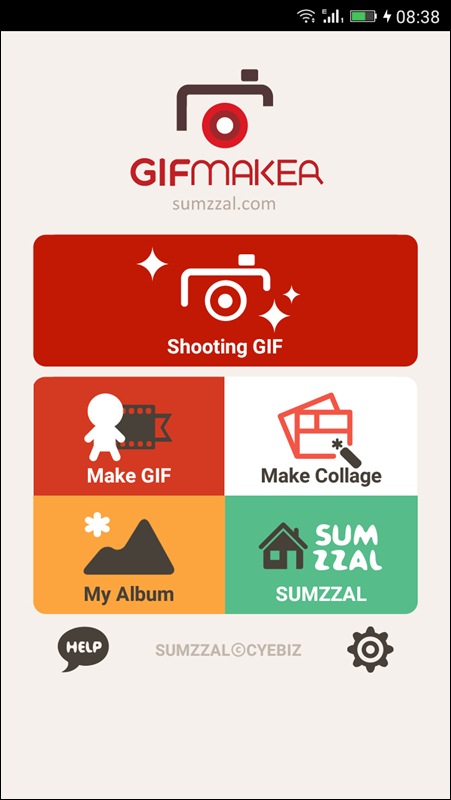
Step 1. First of all, download and install the cool Android app GIF Maker on your Android device.
Create Animated GIFs From Images in Android
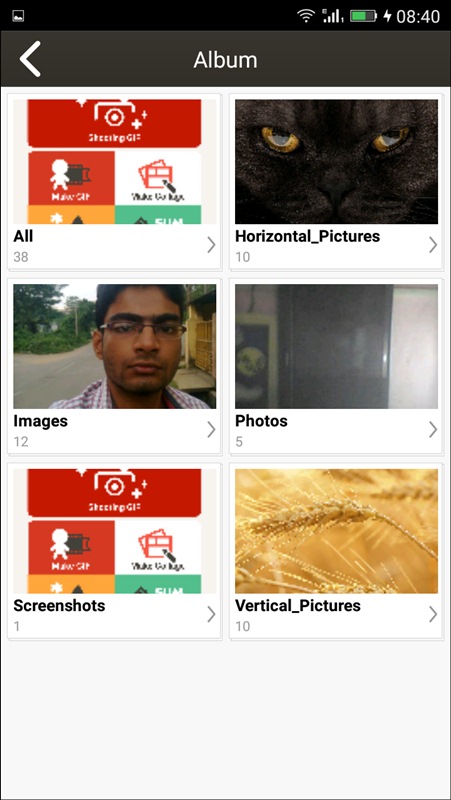
Step 2. Now if you want to create GIF from your existing photos or screenshot then select the option “Make GIF” it will open your Album
Create Animated GIFs From Images in Android
Step 3. Now select your desired album and choose the photos, in the screenshot below I have selected four photos.
Create Animated GIFs From Images in Android
Step 4. Now you have to click on the icon located in a top right corner of your screen.
Create Animated GIFs From Images in Android
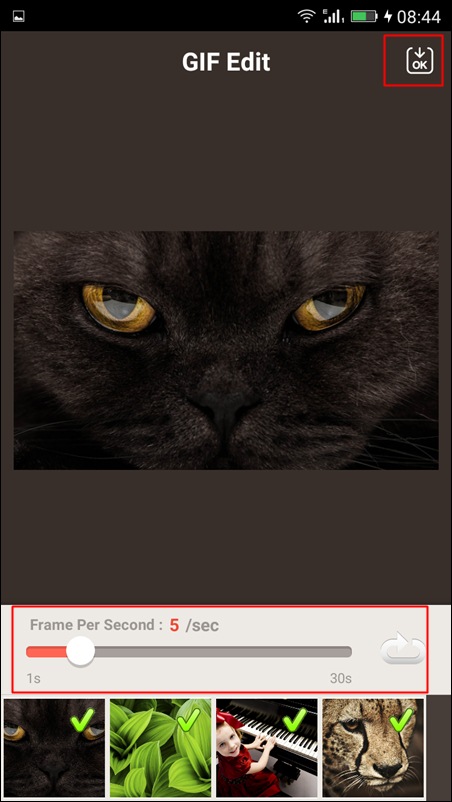
Step 5. Now you can see your created GIF, you need to click on “Edit GIF” option and can remove pictures from your GIF and can set time in “Frame per second” and click on “OK” and then “SAVE.”
Create Animated GIFs From Images in Android

That’s it! You are done, your GIF screenshot is ready in your gallery that is having multiple screen effects in one, and there will be no huge video that can load your memory, just a GIF images that will be of just memory in KBs.
Create Animated GIFs From Images in Android
Also Read:

Method 2: Using GIF Camera
Gif camera is an easy tool that helps you to create animated Gifs on Android. You even get the tools that help you to create Gif from your local photos.
Step 1. First of all, download and install GIF camera on your Android smartphone.
Price: Free 
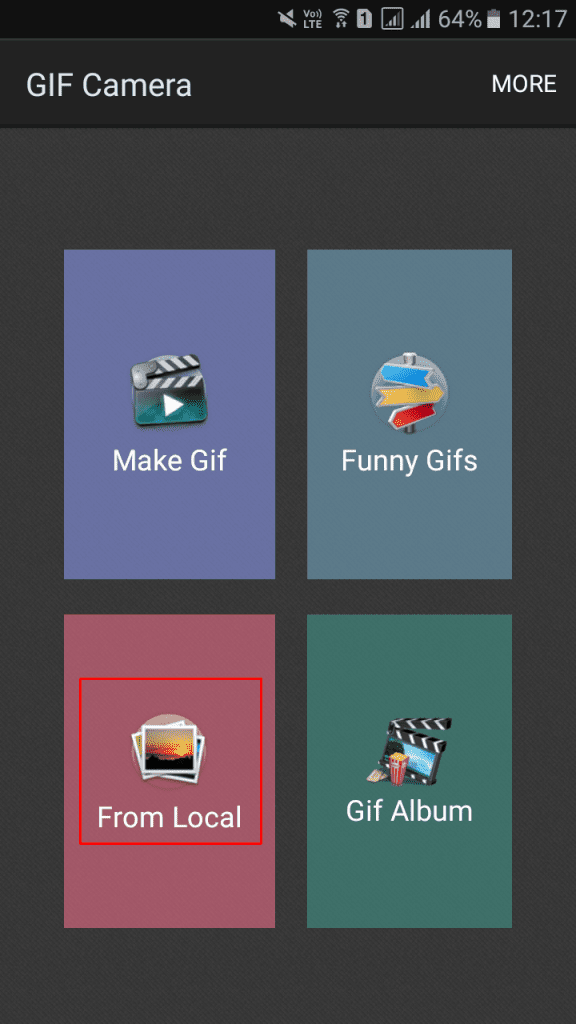
Step 2. Now you need to tap on “From Local” to create GIFs from your existing photos.
Using GIF Camera
Step 3. Now start selecting the pictures. It will display your numbers – 1,2,3,4 and then click on the tick mark on the top right corner.
Using GIF Camera
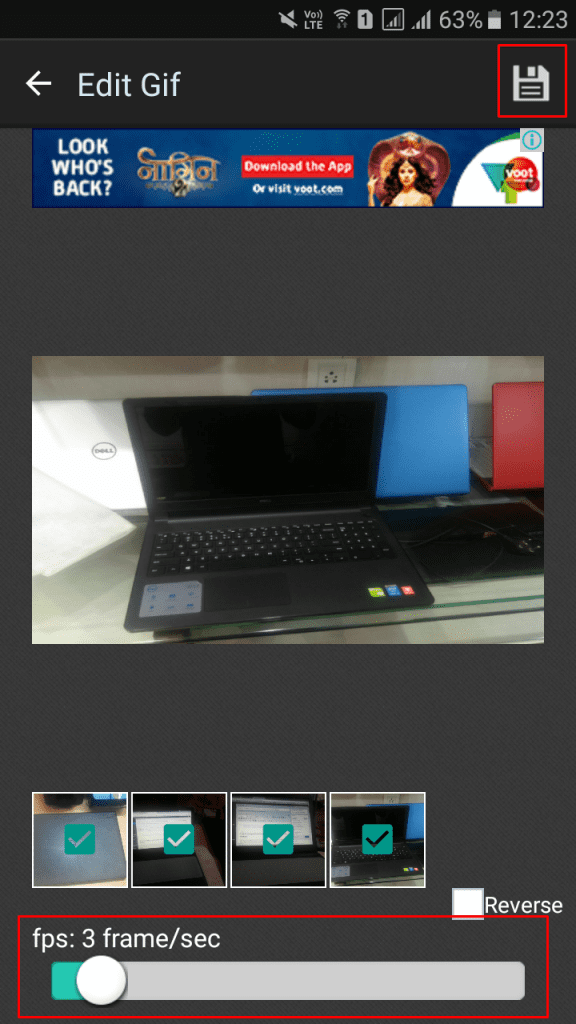
Step 4. Now in the very next step, you need to select the Frame per second “Frame” and the tap on save icon located on the top right corner.
Using GIF Camera
That’s it! You are done and  you have successfully created Animated Gifs from your local photos.
Using GIF Camera
So above is all about How To Capture Animated GIF Screenshots In Android. With this method, you can easily make you desired animated GIF on your Android by just merging up the different photos in one. And you can solve someone technical problems of Android with this GIF animation with step by step display. Hope you like this cool method, keep on sharing with others. Leave a comment below if you have any related queries with this.
Read More »

How to Get Unlimited Call Log on Android Phone

How to Get Unlimited Call Log on Android Phone
Get unlimited call Log on Android
Now get unlimited call log on Android with the help of simple Android tweak that will let you to do that and you can easily maintain the old call records in your Android phone. Here in this article, we have written the method through which this could be done, just read the article to know about the method.

Any Android device is made in such a way that it could only withhold the limited amount of 500 incoming, outgoing or missed calls record and crossing up the limit just deletes the previously saved evaluations. Now for the common users this much limit would be more than enough, and they won’t either require even that much also for keeping in touch with the call records but for some intense users those who need greatly to keep updated with all the calls that they have received or they had made the limit of 500 could be really a barrier. Now if you are the one who wishes to keep the detailed records of the calls on your Android device then there is a method through which the limit of storing the call logs could be increased to infinity! Yes, till infinity and your device could then store about unlimited call logs.

How to Get Unlimited Call Log on Android Phone
For this, you will need a rooted Android, Lollipop OS or higher, Xposed Framework Installed on your device.
Also Read:

Steps to Get unlimited call Log on Android:
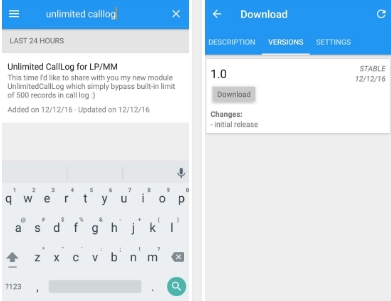
Open the Xposed Installer app and from there just go to the download option and then search for the Unlimited CallLog for LP/MM module or the app. The app would return with the same option, just open that and swipe to the versions tab there to download it.After downloading that module from there just make sure to activate that and after that restart the device. This could be easily done through checking the Modules from the app and then activating the particular one of the options.Get unlimited Call logs on AndroidAnd that’s all! Yes, you have done that and from now onwards, your device would store every of the call log and won’t remove it with the limits of 500 logs.Unlimited call logs could be then saved on your device, and that’s all. This app works with the most of the Dialer apps and mostly with the stock Android dialers.
Also Read:

This was all about how you could get the unlimited call log on your Android device and as you have already got that this is extremely easy to get that if you have your device rooted before only and you would not require any addition advanced actions to be performed so as to get the results too. Just follow the exact steps as given in this article to get the unlimited call log on the Android device.
Read More »

PSI Recruitment Board (PSIRB) PSI/ ASI/ IO/ AIO Main Exam Provisional Answer Key Declared

PSI Recruitment Board (PSIRB) PSI/ ASI/ IO/ AIO Main Exam Provisional Answer Key Declared.

PSI Recruitment Board (PSIRB) PSI/ ASI/ IO/ AIO Main Exam Provisional Answer Key Declared.

THIS BLOG IS DAILY UPDATE ABOUT PRIMARY SCHOOL LATEST CIRCULAR, EDUCATIONAL NEWS, NEWS PAPER NEWS, ALL GOVERNMENT AND PRIVATE JOB, LATEST TECHNOLOGY TIPS, INSURANCE, LOANS, LATEST MOBILE TIPS AND ALL COMPETITIVE EXAM MOST IMP GK, MODEL PAPERS, EXAM OLD PAPER, MODEL PAPER IN MP3 AND MOST IMP GK MP3, EXAM MATERIALS... LIKE TET,TAT,HTAT, POLICE CONSTABLE BHARTI, GSSSB CLERK, TALATI, AND OTHER EXAMS. SO MUST VISIT THIS BLOG EVERYDAY FOR LATEST UPDATES AND GENERAL INFORMATION.

Download Provisional Answer Key:

Law Paper
General Knowledge Paper
English Paper
Gujarati Paper

CLICK HERE TO VIEW

Read More »

District Panchayat Devbhumi Dwarka Recruitment 2017 for Various Posts :

District Panchayat Devbhumi Dwarka Recruitment 2017 for Various Posts :
District Panchayat Devbhumi Dwarka Published Recruitment Notification for Computer Engineer, Technical Assistant, District Project Manager and Computer Operator Posts.


Total Posts : 08

Posts Name, Qualification & Salary :

District Level Posts :

Computer EngineerQualification : B.E. (Computer Engineering) (50%)Salary : Rs. 20000/-Technical AssistantQualification : B.E. (Civil) with Second Class (50%)Salary : Rs. 20000/-District Project ManagerQualification : M.B.A. (50%)Salary : Rs. 20000/-Computer OperatorQualification: Graduate in any Branch with C.C.C. PassSalary : Rs. 8000/-

Taluka Level Posts :
Technical AssistantQualification : B.E. (Civil) with Second Class (50%)Salary : Rs. 20000/-


Age Limit : 25 years to 45 years


Send Application to This Address : Office of District Development Officer, Development Branch, Old General Hospital Compound, District Panchayat, Devbhumi Dwarka, Jam Khambhaliya.


Application Last Date : 20th March, 2017
View Recruitment Advertisement In Below Image


.
Read More »

Sunday, March 5, 2017

How To Remove Stock Apps In Android Without Rooting

How To Remove Stock Apps In Android Without Rooting

Remove Stock Apps In Android

As we all know, pre-installed bloatwares are totally useless, which not only slow down the phone’s performance but also consume lot’s of memory. Therefore, we are going to share an easy methods that will help you to remove stock apps in your Android device without rooting. Go through the post to know about it.


In Android, there some stock apps that are pre-installed from Google or the manufacturer company. As we all know, pre-installed bloatware is almost useless, which not only slow down the phone’s performance but also consumes lot’s of memory. However, you can’t just remove them from your device. So we have a cool way by which you can quickly remove any stock app without rooting your Android. So follow the complete guide discussed below to proceed.


How To Remove Stock Apps in Android without Rooting

Using Android Settings:

Well, the first things to do after getting the new Android smartphone is to remove all those extra apps that you think you don’t need. Well, stock apps depend on your phone and your carrier. Therefore, you might not completely remove all stock apps from your phone. However, you can stop it permanently.

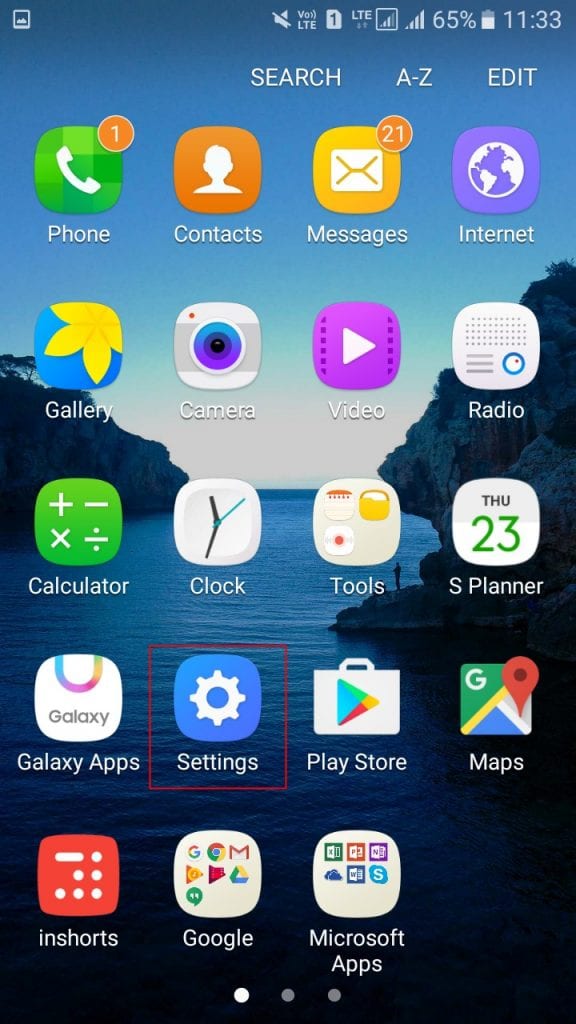
Step 1. First of all, navigate to settings

Using Android Settings

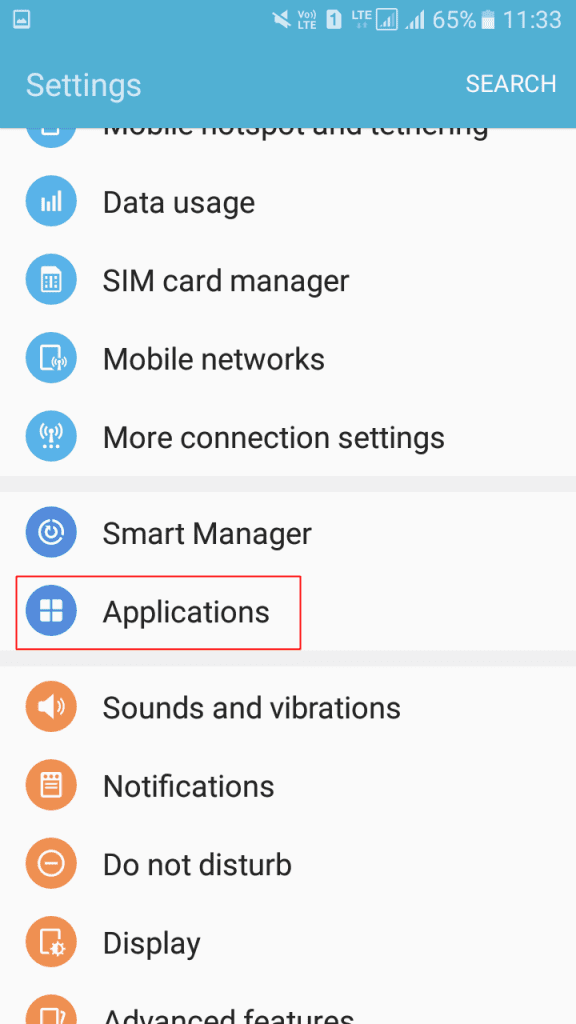
Step 2. Now you need to tap on “Apps.”

Using Android Settings

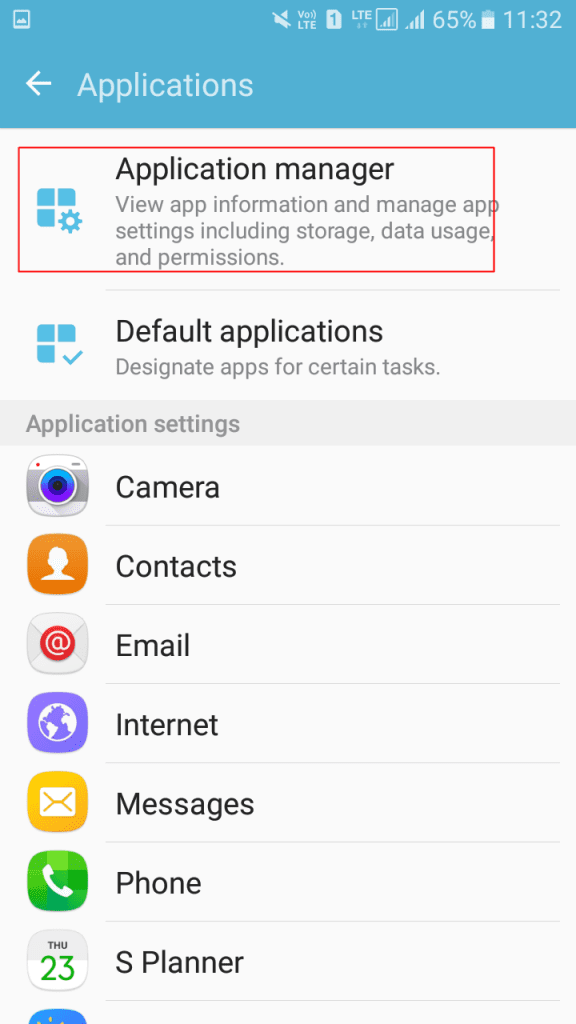
Step 3. Now you need to tap on Application Manager

Using Android Settings

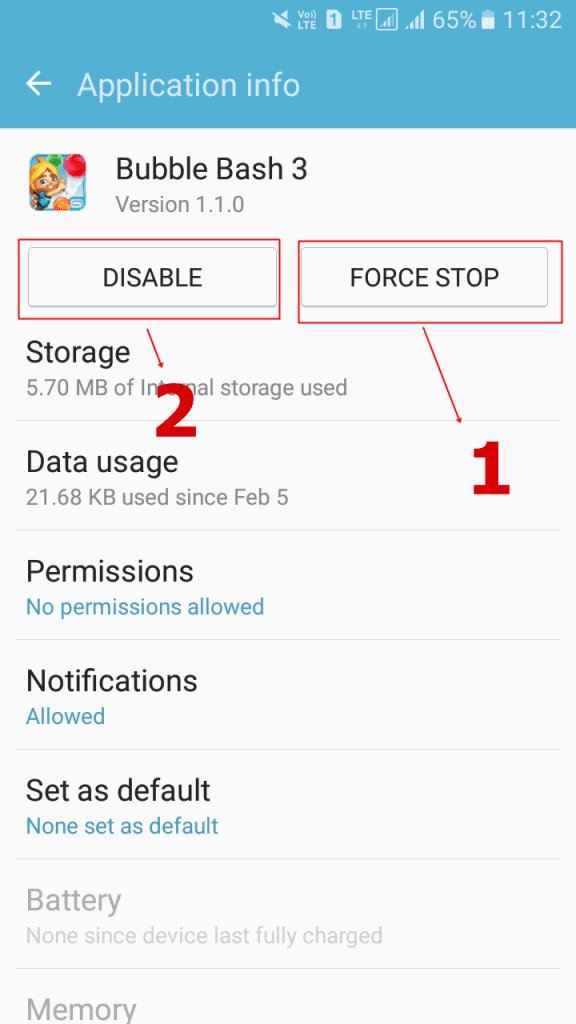
Step 4. Like in the screenshot mentioned below, it’s the game that I got, and you can see it doesn’t have an option of “Uninstall.” So, here you need to tap on “Force Stop” and then tap on “Disable.”

Using Android Settings

That’s it! Now repeat it for every app that you think you will need. This will disable the app. If you need to uninstall it completely, then you need to follow the next method.

The method is very simple but a tricky one where you have to use tools in your Windows PC that will allow you to edit or remove system apps of your Android device. So follow the steps below to proceed with removing any pre-installed apps from your Android without any need of rooting.


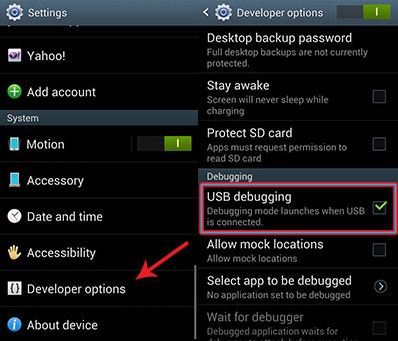
Step 1. First of all, you need to enable developer option which you can enable by heading to Settings -> About Phone -> Build Number (Tap on build number 7-10 times and your developer options will get activated).

Step 2. Now you will see developer option in your settings and tap on it and scroll down and enable USB Debugging.

Remove Stock Apps In Android

Step 3. Now you need to download and install Debloater tool in your Windows PC that will allow you to remove system apps from your device. Now connect your Android device with USB cable to your PC and wait for the tool to detect your device.  Once discovered, the debloater tool would prompt you with a Warning message

Remove Stock Apps In Android

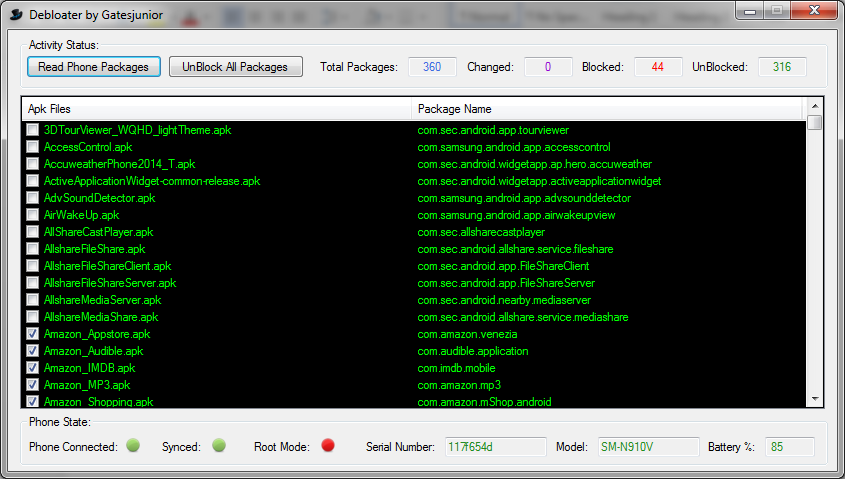
Step 4. Now you need to click on “Read Phone Packages” which is located on the top left corner it will start reading all of the applications on your device.

Remove Stock Apps In Android

Step 5. Now you will be listed with many applications it detects as blocked and not blocked

Remove Stock Apps In Android

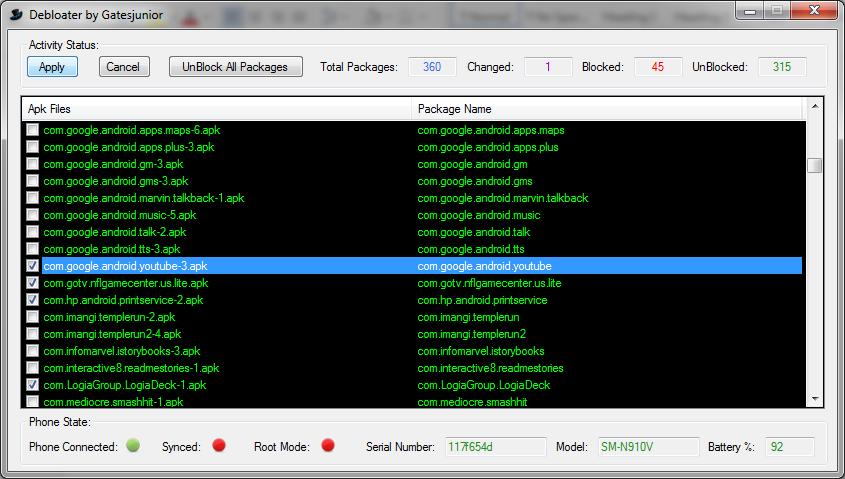
Step 6. Now mark the apps that you want to delete from your device and then you just need to click on “apply” button, and this will block all those apps from your device.

Remove Stock Apps In Android

You can also undo the process by simply unselecting them. That’s it! You are done, now all those apps will be removed from your device, and your phone’s storage will be free from them.


So above is all about Remove Stock Apps in Android without Rooting. With the above-discussed method, you can quickly remove system apps from your device without the need of rooting your device and voiding your warranty. Hope you like this cool solution, do share with others too. Leave a comment below if you have any related queries with this.

Read More »

How To Take Screenshot Of Full Webpage

How To Take Screenshot Of Full Webpage

How to Take Screenshot of Full Webpage

Easily take screenshot of full webpage with a single click in your web browser using the extension that will quickly make the full page to full page screenshot image in new tab. Follow the below article to know how can you do that.


Many of you might keep on searching all new things over the internet. As a tech geek, I also find tech guides, but sometimes we need to save some research quick for the later use. In that situation, we keep on taking some of the screenshots or bookmarking the pages. But the most common problem that every user faces is the screenshot of the complete web page as usually this is taken on the current screen resolution and I am sure almost every website page is captured in the 2-3 screenshots, and that can increase your work quite more. And what if you can take the entire web page screenshot in a single go. Yes, it’s possible as in this guide we are discussing the same. And with the help of this, you can quickly capture the entire web page screenshot with the single click. So have a look at complete guide discussed below to proceed.


Content

How to Take Screenshot of Full Webpage

The method is very simple and straight, and you just need to use a simple browser extension that will take screenshot instantly of the complete web page. So follow the below step by step guide to do it.


Steps To Take Screenshot of Full Webpage:

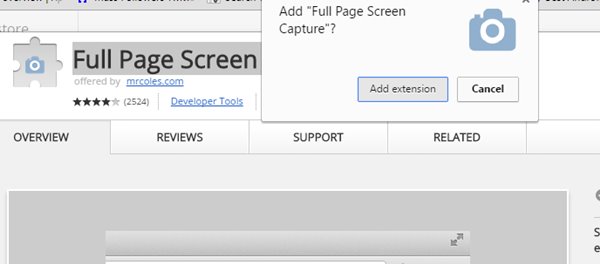
Step 1. First of all, in your browser, you need to add the extension that will take the entire web page screenshot for you and the extension Full Web Page Screenshots will be helpful and this is available for both Mozilla Firefox and Google Chrome.

Step 2. Visit the page and add this extension in your browser, and within seconds it will get added to your browser. Now you will see the camera like icon at the top right corner of your browser that indicates that extension is successfully added to your browser.

Full Web Page Screenshots

Step 3. Now you need to open the web page whose full page screenshot you want to capture.

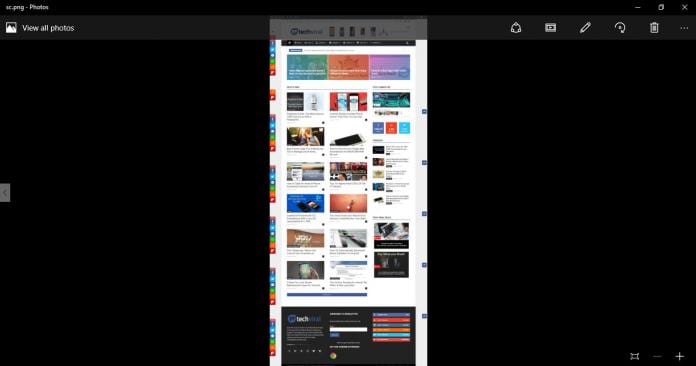
Step 4. Now just click on the camera icon there and this will take 2-3 seconds and a screenshot will get captured and will get opened in the new tab, and you can directly save that image to your computer.

Full Web Page Screenshots

That’s it, and you are done. Now you will have the complete web page screenshot in the single click.


Using Fireshot

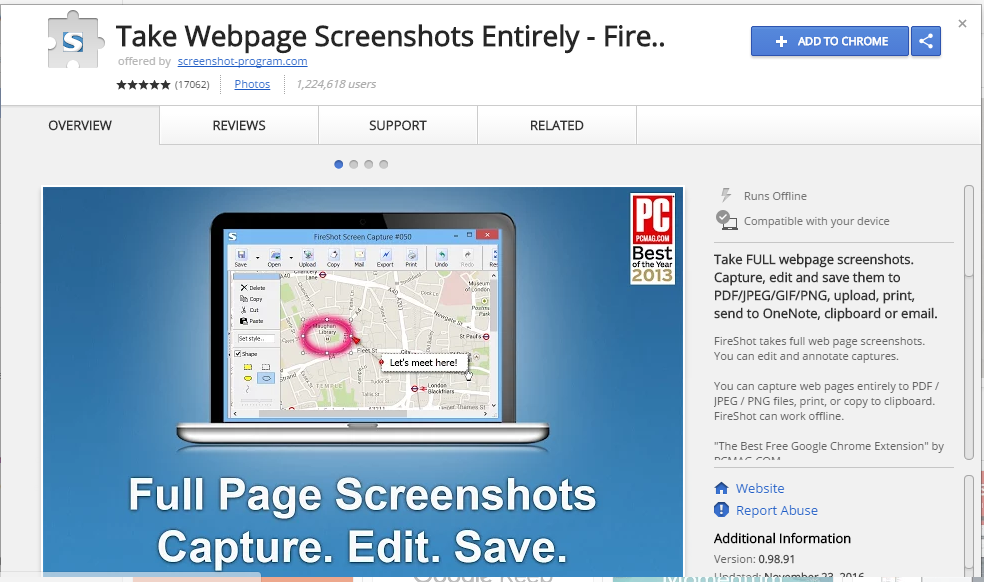
FireShot takes full web page screenshots. You can edit and annotate captures. You can capture web pages entirely to PDF / JPEG / PNG files, print, or copy to clipboard. FireShot can work offline. This is a must have for every Google Chrome users as this is not limited to taking screenshots. You also get some extended options to use the screenshots. Let’s know how to use it.

Step 1. First of all, you need to open your Google Chrome browser and search for Fireshot. Or else, click on this link which will take you to Chrome Webstore, enable the extension.

Using Fireshot

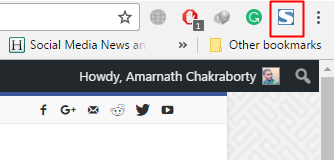
Step 2. Now after installing the extension on your Google Chrome browser, you will notice a small “S” icon added to your extension bar.

Using Fireshot

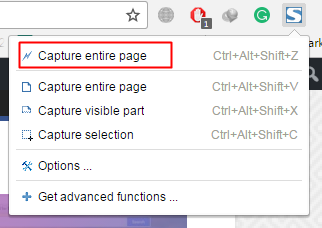
Step 3. Now you need to visit the website which you want to capture the entire page. Click on the “S” icon and there click on “Capture Entire Page.”

Using Fireshot

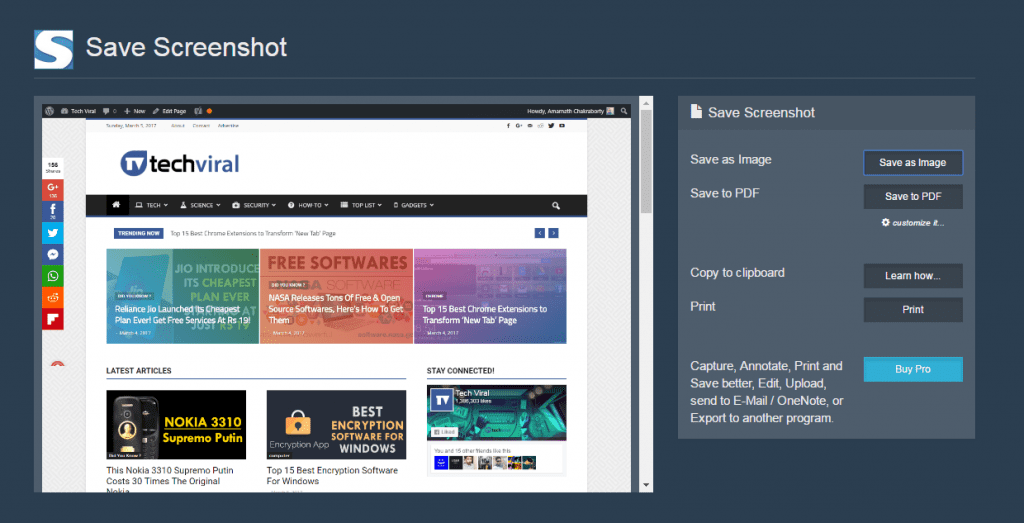
Step 4. Now you will be immediately redirected to the new page where you will get to see the screenshot.

Using Fireshot

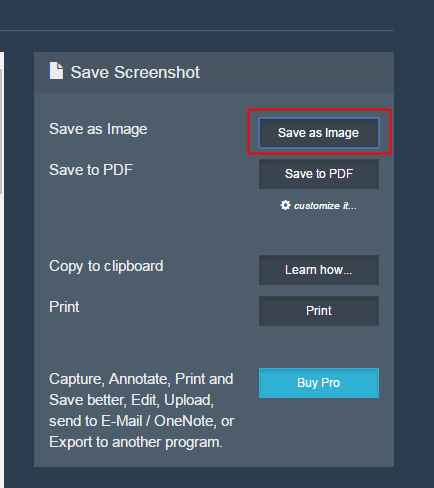
Step 5. Now if you want to save the image on your computer, click on “Save as Image.”

Using Fireshot

That’s it! You are done. This is the easiest way to capture entire webpage.


So above discussion is all about Take Screenshot of Full Webpage. By using the above guide, you can easily save the complete web page in a single screenshot, and that will be hugely helpful in your daily use. Hope you like this, keep on sharing with others too. Leave a comment below if you have any related queries with this.

Read More »

Indian Institute of Teacher Education (IITE) Recruitment 2017 for 22 Assistant Professor Posts

Indian Institute of Teacher Education (IITE) Recruitment 2017 for 22 Assistant Professor Posts

Indian Institute of Teacher Education (IITE) Recruitment 2017 for 22 Assistant Professor Posts :

Indian Institute of Teacher Education (IITE) Gandhinagar Published Recruitment Notification Assistant Professor Posts.


Total Posts : 22

Posts Name & Subject :

For B.Sc. B.Ed. Course :

Assistant ProfessorSubject : Education (Pedagogy - Mathematics / Science)Assistant ProfessorSubject : Education (Perspective in Education)

For B.A. B.Ed. Course :

Assistant ProfessorSubject : Education (Pedagogy - English)Assistant ProfessorSubject : Education (Perspective in Education)Assistant ProfessorSubject : Education (Perspective in Education)

For M.Sc. / M.A. M.Ed. Course :

Assistant ProfessorSubject : Education

For M.Ed. Course :

Assistant ProfessorSubject : Education

Salary : Rs. 25000/- (Per Month)

Qualficiation : See Official Notification

Interview Address : Indian Institute of Teacher Education, C/o. Ramkrushna Paramhans Education Sankul, Near Mahatma Mandir, Sector No. 15, "Kh" Road, Gandhinagar - 382016.

See Also : Kendriya Vidyalaya AFS Naliya Recruitment 2017 for Various Posts

Interview Date : 9th March, 2017

Interview Time :

For B.Sc. B.Ed. Course : 11:00 amFor B.A. B.Ed. Course : 12:00 pmFor M.Sc. / M.A. M.Ed. Course : 2:00 pmFor M.Ed. Course : 4:00 pm

View Official Recruitment Notification Here

Download Application Form Here

Read More »